DAY 18
ANDROID
Broadcast Receiver
Broadcast Receivers simply respond to broadcast messages from other applications or from the system itself. These messages are sometime called events or intents. For example, applications can also initiate broadcasts to let other applications know that some data has been downloaded to the device and is available for them to use, so this is broadcast receiver who will intercept this communication and will initiate appropriate action.
There are following two important steps to make BroadcastReceiver works for the system broadcasted intents −
- Creating the Broadcast Receiver.
- Registering Broadcast Receiver
There is one additional steps in case you are going to implement your custom intents then you will have to create and broadcast those intents.
Creating Broadcast Receiver:
A broadcast receiver is implemented as a subclass of BroadcastReceiverclass and overriding the onReceive() method where each message is received as a Intent object parameter.
public class MyReceiver extends BroadcastReceiver {
   @Override
   public void onReceive(Context context, Intent intent) {
      Toast.makeText(context, "Intent Detected.", Toast.LENGTH_LONG).show();
   }
}
Registering Broadcast Receiver:
An application listens for specific broadcast intents by registering a broadcast receiver in AndroidManifest.xml file. Consider we are going to register MyReceiver for system generated event ACTION_BOOT_COMPLETED which is fired by the system once the Android system has completed the boot process.
<application
   android:icon="@drawable/ic_launcher"
   android:label="@string/app_name"
   android:theme="@style/AppTheme" >
   <receiver android:name="MyReceiver">

      <intent-filter>
         <action android:name="android.intent.action.BOOT_COMPLETED">
         </action>
      </intent-filter>

   </receiver>
</application>
Now whenever your Android device gets booted, it will be intercepted by BroadcastReceiver MyReceiver and implemented logic inside onReceive() will be executed.
Broadcsting Custom Intents
If you want your application itself should generate and send custom intents then you will have to create and send those intents by using the sendBroadcast() method inside your activity class. If you use the sendStickyBroadcast(Intent) method, the Intent is sticky, meaning the Intentyou are sending stays around after the broadcast is complete.
public void broadcastIntent(View view) {
   Intent intent = new Intent();
   intent.setAction("com.tutorialspoint.CUSTOM_INTENT");
   sendBroadcast(intent);
}
This intent com.tutorialspoint.CUSTOM_INTENT can also be registered in similar way as we have regsitered system generated intent.
<application
   android:icon="@drawable/ic_launcher"
   android:label="@string/app_name"
   android:theme="@style/AppTheme" >
   <receiver android:name="MyReceiver">

      <intent-filter>
         <action android:name="com.tutorialspoint.CUSTOM_INTENT">
         </action>
      </intent-filter>

   </receiver>
</application>
Example:
Following is the content of the modified main activity file MainActivity.java. This file can include each of the fundamental life cycle methods. We have added broadcastIntent() method to broadcast a custom intent.
package com.example.tutorialspoint7.myapplication;

import android.app.Activity;
import android.content.Intent;
import android.os.Bundle;
import android.view.View;

public class MainActivity extends Activity {

   /** Called when the activity is first created. */
   @Override

   public void onCreate(Bundle savedInstanceState) {
      super.onCreate(savedInstanceState);
      setContentView(R.layout.activity_main);
   }


   // broadcast a custom intent.

   public void broadcastIntent(View view){
      Intent intent = new Intent();
      intent.setAction("com.tutorialspoint.CUSTOM_INTENT"); sendBroadcast(intent);
   }
}
Following is the content of MyReceiver.java:
package com.example.tutorialspoint7.myapplication;

import android.content.BroadcastReceiver;
import android.content.Context;
import android.content.Intent;
import android.widget.Toast;

/**
 * Created by TutorialsPoint7 on 8/23/2016.
 */
public class MyReceiver extends BroadcastReceiver{
   @Override
   public void onReceive(Context context, Intent intent) {
      Toast.makeText(context, "Intent Detected.", Toast.LENGTH_LONG).show();
   }
}
Following will the modified content of AndroidManifest.xml file. Here we have added <receiver.../> tag to include our service:
<?xml version="1.0" encoding="utf-8"?>
<manifest xmlns:android="http://schemas.android.com/apk/res/android"
   package="com.example.tutorialspoint7.myapplication">

   <application
      android:allowBackup="true"
      android:icon="@mipmap/ic_launcher"
      android:label="@string/app_name"
      android:supportsRtl="true"
      android:theme="@style/AppTheme">

      <activity android:name=".MainActivity">
         <intent-filter>
            <action android:name="android.intent.action.MAIN" />

            <category android:name="android.intent.category.LAUNCHER" />
         </intent-filter>
      </activity>

      <receiver android:name="MyReceiver">
         <intent-filter>
            <action android:name="com.tutorialspoint.CUSTOM_INTENT">
            </action>
         </intent-filter>

      </receiver>
   </application>

</manifest>
Following will be the content of res/layout/activity_main.xml file to include a button to broadcast our custom intent −
<RelativeLayout
   xmlns:android="http://schemas.android.com/apk/res/android"
   xmlns:tools="http://schemas.android.com/tools"
   android:layout_width="match_parent"
   android:layout_height="match_parent"
   android:paddingLeft="@dimen/activity_horizontal_margin"
   android:paddingRight="@dimen/activity_horizontal_margin"
   android:paddingTop="@dimen/activity_vertical_margin"
   android:paddingBottom="@dimen/activity_vertical_margin"
   tools:context=".MainActivity">

   <TextView
      android:id="@+id/textView1"
      android:layout_width="wrap_content"
      android:layout_height="wrap_content"
      android:text="Example of Broadcast"
      android:layout_alignParentTop="true"
      android:layout_centerHorizontal="true"
      android:textSize="30dp" />

   <TextView
      android:id="@+id/textView2"
      android:layout_width="wrap_content"
      android:layout_height="wrap_content"
      android:text="Tutorials point "
      android:textColor="#ff87ff09"
      android:textSize="30dp"
      android:layout_above="@+id/imageButton"
      android:layout_centerHorizontal="true"
      android:layout_marginBottom="40dp" />

   <ImageButton
      android:layout_width="wrap_content"
      android:layout_height="wrap_content"
      android:id="@+id/imageButton"
      android:src="@drawable/abc"
      android:layout_centerVertical="true"
      android:layout_centerHorizontal="true" />

   <Button
      android:layout_width="wrap_content"
      android:layout_height="wrap_content"
      android:id="@+id/button2"
      android:text="Broadcast Intent"
      android:onClick="broadcastIntent"
      android:layout_below="@+id/imageButton"
      android:layout_centerHorizontal="true" />

</RelativeLayout>
Internal Storage - Data Manipulation:
Android provides many kinds of storage for applications to store their data. These storage places are shared preferences, internal and external storage, SQLite storage, and storage via network connection.
In this chapter we are going to look at the internal storage. Internal storage is the storage of the private data on the device memory.
By default these files are private and are accessed by only your application and get deleted , when user delete your application.
Writing File
In order to use internal storage to write some data in the file, call the openFileOutput() method with the name of the file and the mode. The mode could be private , public e.t.c. Its syntax is given below −
FileOutputStream fOut = openFileOutput("file name here",MODE_WORLD_READABLE);
The method openFileOutput() returns an instance of FileOutputStream. So you receive it in the object of FileInputStream. After that you can call write method to write data on the file. Its syntax is given below −
String str = "data";
fOut.write(str.getBytes());
fOut.close();
Reading File
In order to read from the file you just created , call the openFileInput() method with the name of the file. It returns an instance of FileInputStream. Its syntax is given below −
FileInputStream fin = openFileInput(file);
After that, you can call read method to read one character at a time from the file and then you can print it. Its syntax is given below −
int c;
String temp="";
while( (c = fin.read()) != -1){
   temp = temp + Character.toString((char)c);
}

//string temp contains all the data of the file.
fin.close();
Example:
Here is an example demonstrating the use of internal storage to store and read files. It creates a basic storage application that allows you to read and write from internal storage.
Following is the content of the modified main activity file src/MainActivity.java.
package com.example.sairamkrishna.myapplication;

import android.app.Activity;
import android.os.Bundle;
import android.view.View;
import android.widget.Button;
import android.widget.EditText;
import android.widget.TextView;
import android.widget.Toast;
import java.io.FileInputStream;
import java.io.FileOutputStream;

public class MainActivity extends Activity  {
   Button b1,b2;
   TextView tv;
   EditText ed1;

   String data;
   private String file = "mydata";

   @Override
   protected void onCreate(Bundle savedInstanceState) {
      super.onCreate(savedInstanceState);
      setContentView(R.layout.activity_main);

      b1=(Button)findViewById(R.id.button);
      b2=(Button)findViewById(R.id.button2);

      ed1=(EditText)findViewById(R.id.editText);
      tv=(TextView)findViewById(R.id.textView2);
      b1.setOnClickListener(new View.OnClickListener() {

         @Override
         public void onClick(View v) {
            data=ed1.getText().toString();
            try {
               FileOutputStream fOut = openFileOutput(file,MODE_WORLD_READABLE);
               fOut.write(data.getBytes());
               fOut.close();
               Toast.makeText(getBaseContext(),"file saved",Toast.LENGTH_SHORT).show();
            }
            catch (Exception e) {
               // TODO Auto-generated catch block
               e.printStackTrace();
            }
         }
      });

      b2.setOnClickListener(new View.OnClickListener() {

         @Override
         public void onClick(View v) {
            try {
               FileInputStream fin = openFileInput(file);
               int c;
               String temp="";
               while( (c = fin.read()) != -1){
                  temp = temp + Character.toString((char)c);
               }
               tv.setText(temp);
               Toast.makeText(getBaseContext(),"file read",Toast.LENGTH_SHORT).show();
            }
            catch(Exception e){
            }
         }
      });
   }
}
Following is the modified content of the xml res/layout/activity_main.xml
<?xml version="1.0" encoding="utf-8"?>
<RelativeLayout xmlns:android="http://schemas.android.com/apk/res/android"
   xmlns:tools="http://schemas.android.com/tools" android:layout_width="match_parent"
   android:layout_height="match_parent" android:paddingLeft="@dimen/activity_horizontal_margin"
   android:paddingRight="@dimen/activity_horizontal_margin"
   android:paddingTop="@dimen/activity_vertical_margin"
   android:paddingBottom="@dimen/activity_vertical_margin" tools:context=".MainActivity">

   <TextView android:text="Internal storage" android:layout_width="wrap_content"
      android:layout_height="wrap_content"
      android:id="@+id/textview"
      android:textSize="35dp"
      android:layout_alignParentTop="true"
      android:layout_centerHorizontal="true" />

   <TextView
      android:layout_width="wrap_content"
      android:layout_height="wrap_content"
      android:text="Tutorials point"
      android:id="@+id/textView"
      android:layout_below="@+id/textview"
      android:layout_centerHorizontal="true"
      android:textColor="#ff7aff24"
      android:textSize="35dp" />

   <Button
      android:layout_width="wrap_content"
      android:layout_height="wrap_content"
      android:text="Save"
      android:id="@+id/button"
      android:layout_alignParentBottom="true"
      android:layout_alignLeft="@+id/textView"
      android:layout_alignStart="@+id/textView" />

   <EditText
      android:layout_width="wrap_content"
      android:layout_height="wrap_content"
      android:id="@+id/editText"
      android:hint="Enter Text"
      android:focusable="true"
      android:textColorHighlight="#ff7eff15"
      android:textColorHint="#ffff25e6"
      android:layout_below="@+id/imageView"
      android:layout_alignRight="@+id/textView"
      android:layout_alignEnd="@+id/textView"
      android:layout_marginTop="42dp"
      android:layout_alignLeft="@+id/imageView"
      android:layout_alignStart="@+id/imageView" />

   <ImageView
      android:layout_width="wrap_content"
      android:layout_height="wrap_content"
      android:id="@+id/imageView"
      android:src="@drawable/abc"
      android:layout_below="@+id/textView"
      android:layout_centerHorizontal="true" />

   <Button
      android:layout_width="wrap_content"
      android:layout_height="wrap_content"
      android:text="load"
      android:id="@+id/button2"
      android:layout_alignTop="@+id/button"
      android:layout_alignRight="@+id/editText"
      android:layout_alignEnd="@+id/editText" />

   <TextView
      android:layout_width="wrap_content"
      android:layout_height="wrap_content"
      android:text="Read"
      android:id="@+id/textView2"
      android:layout_below="@+id/editText"
      android:layout_toLeftOf="@+id/button2"
      android:layout_toStartOf="@+id/button2"
      android:textColor="#ff5bff1f"
      android:textSize="25dp" />

</RelativeLayout>
Following is the content of the res/values/string.xml.
<resources>
   <string name="app_name">My Application</string>
</resources>
Following is the content of AndroidManifest.xml file.
<?xml version="1.0" encoding="utf-8"?>
<manifest xmlns:android="http://schemas.android.com/apk/res/android"
   package="com.example.sairamkrishna.myapplication" >
   <application
      android:allowBackup="true"
      android:icon="@mipmap/ic_launcher"
      android:label="@string/app_name"
      android:theme="@style/AppTheme" >

      <activity
         android:name=".MainActivity"
         android:label="@string/app_name" >

         <intent-filter>
            <action android:name="android.intent.action.MAIN" />
            <category android:name="android.intent.category.LAUNCHER" />
         </intent-filter>

      </activity>

   </application>
</manifest>
Android Services
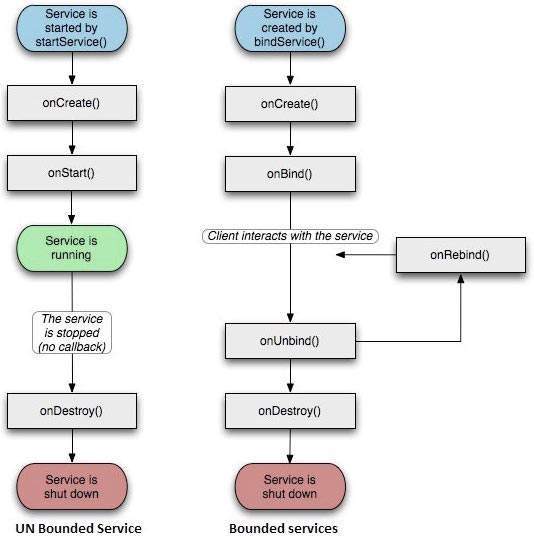
A service is a component that runs in the background to perform long-running operations without needing to interact with the user and it works even if application is destroyed. A service can essentially take two states −
| NO. | State & Description |
|---|---|
| 1 |
Started
A service is started when an application component, such as an activity, starts it by calling startService(). Once started, a service can run in the background indefinitely, even if the component that started it is destroyed.
|
| 2 |
Bound
A service is bound when an application component binds to it by calling bindService(). A bound service offers a client-server interface that allows components to interact with the service, send requests, get results, and even do so across processes with interprocess communication (IPC).
|
A service has life cycle callback methods that you can implement to monitor changes in the service's state and you can perform work at the appropriate stage. The following diagram on the left shows the life cycle when the service is created with startService() and the diagram on the right shows the life cycle when the service is created with bindService(): (image courtesy : android.com )
To create an service, you create a Java class that extends the Service base class or one of its existing subclasses. The Service base class defines various callback methods and the most important are given below. You don't need to implement all the callbacks methods. However, it's important that you understand each one and implement those that ensure your app behaves the way users expect.
| NO. | Callback & Description |
|---|---|
| 1 |
onStartCommand()
The system calls this method when another component, such as an activity, requests that the service be started, by calling startService(). If you implement this method, it is your responsibility to stop the service when its work is done, by calling stopSelf() or stopService() methods.
|
| 2 |
onBind()
The system calls this method when another component wants to bind with the service by calling bindService(). If you implement this method, you must provide an interface that clients use to communicate with the service, by returning an IBinder object. You must always implement this method, but if you don't want to allow binding, then you should return null.
|
| 3 |
onUnbind()
The system calls this method when all clients have disconnected from a particular interface published by the service.
|
| 4 |
onRebind()
The system calls this method when new clients have connected to the service, after it had previously been notified that all had disconnected in its onUnbind(Intent).
|
| 5 |
onCreate()
The system calls this method when the service is first created using onStartCommand() or onBind(). This call is required to perform one-time set-up.
|
| 6 |
onDestroy()
The system calls this method when the service is no longer used and is being destroyed. Your service should implement this to clean up any resources such as threads, registered listeners, receivers, etc.
|
Example:
Following is the content of the modified main activity file MainActivity.java. This file can include each of the fundamental life cycle methods. We have added startService() and stopService() methods to start and stop the service.
package com.example.tutorialspoint7.myapplication;

import android.content.Intent;
import android.support.v7.app.AppCompatActivity;
import android.os.Bundle;

import android.os.Bundle;
import android.app.Activity;
import android.util.Log;
import android.view.View;

public class MainActivity extends Activity {
   String msg = "Android : ";

   /** Called when the activity is first created. */
   @Override
   public void onCreate(Bundle savedInstanceState) {
      super.onCreate(savedInstanceState);
      setContentView(R.layout.activity_main);
      Log.d(msg, "The onCreate() event");
   }

   public void startService(View view) {
      startService(new Intent(getBaseContext(), MyService.class));
   }

   // Method to stop the service
   public void stopService(View view) {
      stopService(new Intent(getBaseContext(), MyService.class));
   }
}
Following is the content of MyService.java. This file can have implementation of one or more methods associated with Service based on requirements. For now we are going to implement only two methods onStartCommand() and onDestroy() −
package com.example.tutorialspoint7.myapplication;

import android.app.Service;
import android.content.Intent;
import android.os.IBinder;
import android.support.annotation.Nullable;
import android.widget.Toast;

/**
   * Created by TutorialsPoint7 on 8/23/2016.
*/

public class MyService extends Service {
   @Nullable
   @Override
   public IBinder onBind(Intent intent) {
      return null;
   }

   @Override
   public int onStartCommand(Intent intent, int flags, int startId) {
      // Let it continue running until it is stopped.
      Toast.makeText(this, "Service Started", Toast.LENGTH_LONG).show();
      return START_STICKY;
   }

   @Override
   public void onDestroy() {
      super.onDestroy();
      Toast.makeText(this, "Service Destroyed", Toast.LENGTH_LONG).show();
   }
}
Following will the modified content of AndroidManifest.xml file. Here we have added <service.../> tag to include our service −
<?xml version="1.0" encoding="utf-8"?>
<manifest xmlns:android="http://schemas.android.com/apk/res/android"
   package="com.example.tutorialspoint7.myapplication">

   <application
      android:allowBackup="true"
      android:icon="@mipmap/ic_launcher"
      android:label="@string/app_name"
      android:supportsRtl="true"
      android:theme="@style/AppTheme">

      <activity android:name=".MainActivity">
         <intent-filter>
            <action android:name="android.intent.action.MAIN" />

            <category android:name="android.intent.category.LAUNCHER" />
         </intent-filter>
      </activity>

      <service android:name=".MyService" />
   </application>

</manifest>
Following will be the content of res/layout/activity_main.xml file to include two buttons −
<RelativeLayout xmlns:android="http://schemas.android.com/apk/res/android"
   xmlns:tools="http://schemas.android.com/tools" android:layout_width="match_parent"
   android:layout_height="match_parent" android:paddingLeft="@dimen/activity_horizontal_margin"
   android:paddingRight="@dimen/activity_horizontal_margin"
   android:paddingTop="@dimen/activity_vertical_margin"
   android:paddingBottom="@dimen/activity_vertical_margin" tools:context=".MainActivity">

   <TextView
      android:id="@+id/textView1"
      android:layout_width="wrap_content"
      android:layout_height="wrap_content"
      android:text="Example of services"
      android:layout_alignParentTop="true"
      android:layout_centerHorizontal="true"
      android:textSize="30dp" />

   <TextView
      android:id="@+id/textView2"
      android:layout_width="wrap_content"
      android:layout_height="wrap_content"
      android:text="Tutorials point "
      android:textColor="#ff87ff09"
      android:textSize="30dp"
      android:layout_above="@+id/imageButton"
      android:layout_centerHorizontal="true"
      android:layout_marginBottom="40dp" />

   <ImageButton
      android:layout_width="wrap_content"
      android:layout_height="wrap_content"
      android:id="@+id/imageButton"
      android:src="@drawable/abc"
      android:layout_centerVertical="true"
      android:layout_centerHorizontal="true" />

   <Button
      android:layout_width="wrap_content"
      android:layout_height="wrap_content"
      android:id="@+id/button2"
      android:text="Start Services"
      android:onClick="startService"
      android:layout_below="@+id/imageButton"
      android:layout_centerHorizontal="true" />

   <Button
      android:layout_width="wrap_content"
      android:layout_height="wrap_content"
      android:text="Stop Services"
      android:id="@+id/button"
      android:onClick="stopService"
      android:layout_below="@+id/button2"
      android:layout_alignLeft="@+id/button2"
      android:layout_alignStart="@+id/button2"
      android:layout_alignRight="@+id/button2"
      android:layout_alignEnd="@+id/button2" />

</RelativeLayout>
Shared Preferences
Android provides many ways of storing data of an application. One of this way is called Shared Preferences. Shared Preferences allow you to save and retrieve data in the form of key,value pair.
In order to use shared preferences, you have to call a method getSharedPreferences() that returns a SharedPreference instance pointing to the file that contains the values of preferences.
SharedPreferences sharedpreferences = getSharedPreferences(MyPREFERENCES, Context.MODE_PRIVATE);
The first parameter is the key and the second parameter is the MODE. Apart from private there are other modes available that are listed below −
| NO. | Mode & description |
|---|---|
| 1 |
MODE_APPEND
This will append the new preferences with the already existing preferences
|
| 2 |
MODE_ENABLE_WRITE_AHEAD_LOGGING
Database open flag. When it is set , it would enable write ahead logging by default
|
| 3 |
MODE_MULTI_PROCESS
This method will check for modification of preferences even if the sharedpreference instance has already been loaded
|
| 4 |
MODE_PRIVATE
By setting this mode, the file can only be accessed using calling application
|
| 5 |
MODE_WORLD_READABLE
This mode allow other application to read the preferences
|
| 6 |
MODE_WORLD_WRITEABLE
This mode allow other application to write the preferences
|
You can save something in the sharedpreferences by using SharedPreferences.Editor class. You will call the edit method of SharedPreference instance and will receive it in an editor object. Its syntax is −
Editor editor = sharedpreferences.edit();
editor.putString("key", "value");
editor.commit();
Apart from the putString method , there are methods available in the editor class that allows manipulation of data inside shared preferences. They are listed as follows −
| NO. | Mode & description |
|---|---|
| 1 |
apply()
It is an abstract method. It will commit your changes back from editor to the sharedPreference object you are calling
|
| 2 |
clear()
It will remove all values from the editor
|
| 3 |
remove(String key)
It will remove the value whose key has been passed as a parameter
|
| 4 |
putLong(String key, long value)
It will save a long value in a preference editor
|
| 5 |
putInt(String key, int value)
It will save a integer value in a preference editor
|
| 6 |
putFloat(String key, float value)
It will save a float value in a preference editor
|
Example:
This example demonstrates the use of the Shared Preferences. It display a screen with some text fields, whose value are saved when the application is closed and brought back when it is opened again.
Following is the content of the modified MainActivity.java.
package com.example.sairamkrishna.myapplication;

import android.content.Context;
import android.content.SharedPreferences;
import android.os.Bundle;
import android.support.v7.app.AppCompatActivity;
import android.view.View;
import android.widget.Button;
import android.widget.EditText;
import android.widget.Toast;

public class MainActivity extends AppCompatActivity {
   EditText ed1,ed2,ed3;
   Button b1;

   public static final String MyPREFERENCES = "MyPrefs" ;
   public static final String Name = "nameKey";
   public static final String Phone = "phoneKey";
   public static final String Email = "emailKey";

   SharedPreferences sharedpreferences;

   @Override
   protected void onCreate(Bundle savedInstanceState) {
      super.onCreate(savedInstanceState);
      setContentView(R.layout.activity_main);

      ed1=(EditText)findViewById(R.id.editText);
      ed2=(EditText)findViewById(R.id.editText2);
      ed3=(EditText)findViewById(R.id.editText3);

      b1=(Button)findViewById(R.id.button);
      sharedpreferences = getSharedPreferences(MyPREFERENCES, Context.MODE_PRIVATE);

      b1.setOnClickListener(new View.OnClickListener() {
         @Override
         public void onClick(View v) {
            String n  = ed1.getText().toString();
            String ph  = ed2.getText().toString();
            String e  = ed3.getText().toString();

            SharedPreferences.Editor editor = sharedpreferences.edit();

            editor.putString(Name, n);
            editor.putString(Phone, ph);
            editor.putString(Email, e);
            editor.commit();
            Toast.makeText(MainActivity.this,"Thanks",Toast.LENGTH_LONG).show();
         }
      });
   }

}
Following is the content of the modified main activity fileres/layout/activiy_main.xml.
<?xml version="1.0" encoding="utf-8"?>
<RelativeLayout xmlns:android="http://schemas.android.com/apk/res/android"
   xmlns:tools="http://schemas.android.com/tools" android:layout_width="match_parent"
   android:layout_height="match_parent" android:paddingLeft="@dimen/activity_horizontal_margin"
   android:paddingRight="@dimen/activity_horizontal_margin"
   android:paddingTop="@dimen/activity_vertical_margin"
   android:paddingBottom="@dimen/activity_vertical_margin" tools:context=".MainActivity">

   <TextView
      android:layout_width="wrap_content"
      android:layout_height="wrap_content"
      android:text="Shared Preference "
      android:id="@+id/textView"
      android:layout_alignParentTop="true"
      android:layout_centerHorizontal="true"
      android:textSize="35dp" />

   <TextView
      android:layout_width="wrap_content"
      android:layout_height="wrap_content"
      android:text="Tutorials Point"
      android:id="@+id/textView2"
      android:layout_below="@+id/textView"
      android:layout_centerHorizontal="true"
      android:textSize="35dp"
      android:textColor="#ff16ff01" />

   <EditText
      android:layout_width="wrap_content"
      android:layout_height="wrap_content"
      android:id="@+id/editText"
      android:layout_below="@+id/textView2"
      android:layout_marginTop="67dp"
      android:hint="Name"
      android:layout_alignParentRight="true"
      android:layout_alignParentEnd="true"
      android:layout_alignParentLeft="true"
      android:layout_alignParentStart="true" />

   <EditText
      android:layout_width="wrap_content"
      android:layout_height="wrap_content"
      android:id="@+id/editText2"
      android:layout_below="@+id/editText"
      android:layout_alignParentLeft="true"
      android:layout_alignParentStart="true"
      android:layout_alignParentRight="true"
      android:layout_alignParentEnd="true"
      android:hint="Pass" />

   <EditText
      android:layout_width="wrap_content"
      android:layout_height="wrap_content"
      android:id="@+id/editText3"
      android:layout_below="@+id/editText2"
      android:layout_alignParentLeft="true"
      android:layout_alignParentStart="true"
      android:layout_alignParentRight="true"
      android:layout_alignParentEnd="true"
      android:hint="Email" />

   <Button
      android:layout_width="wrap_content"
      android:layout_height="wrap_content"
      android:text="Save"
      android:id="@+id/button"
      android:layout_below="@+id/editText3"
      android:layout_centerHorizontal="true"
      android:layout_marginTop="50dp" />

</RelativeLayout>
Following is the content of the modified content of file res/values/strings.xml.
<resources>
   <string name="app_name">My Application</string>
</resources>
Following is the content default file AndroidManifest.xml.
<?xml version="1.0" encoding="utf-8"?>
<manifest xmlns:android="http://schemas.android.com/apk/res/android"
   package="com.example.sairamkrishna.myapplication" >

   <application
      android:allowBackup="true"
      android:icon="@mipmap/ic_launcher"
      android:label="@string/app_name"
      android:theme="@style/AppTheme" >

      <activity
         android:name=".MainActivity"
         android:label="@string/app_name" >

         <intent-filter>
            <action android:name="android.intent.action.MAIN" />
            <category android:name="android.intent.category.LAUNCHER" />
         </intent-filter>

      </activity>

   </application>
</manifest>

Comments
Post a Comment