DAY 14
Android Activity Lifecycle
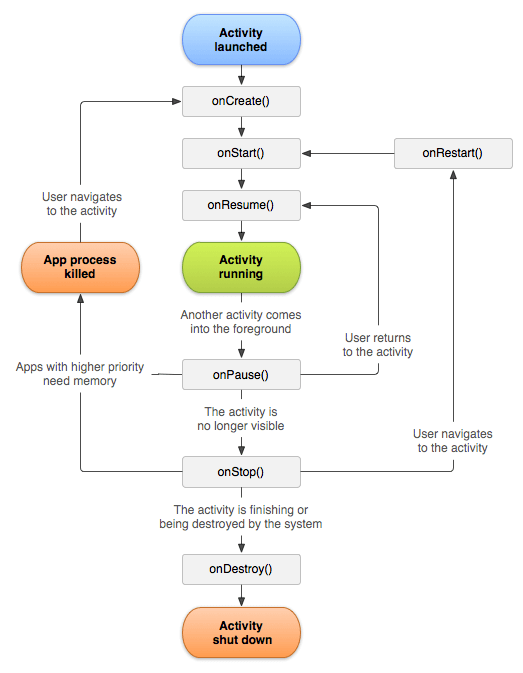
Android Activity Lifecycle is controlled by 7 methods of android.app.Activity class. The android Activity is the subclass of ContextThemeWrapper class.
An activity is the single screen in android. It is like window or frame of Java.
By the help of activity, you can place all your UI components or widgets in a single screen.

Android Activity Lifecycle methods
onCreate called when activity is first created.
onStart called when activity is becoming visible to the user.
onResume called when activity will start interacting with the user.
onPause called when activity is not visible to the user.
onStop called when activity is no longer visible to the user.
onRestart called after your activity is stopped, prior to start.
onDestroy called before the activity is destroyed.
<intent-filter> Tag
- syntax:
<intent-filter android:icon="drawable resource"
               android:label="string resource"
               android:priority="integer" >
    . . .</intent-filter>
- contained in:
<activity><activity-alias><service><receiver>- must contain:
<action>- can contain:
<category><data>- description:
- Specifies the types of intents that an activity, service, or broadcast receiver can respond to. An intent filter declares the capabilities of its parent component — what an activity or service can do and what types of broadcasts a receiver can handle. It opens the component to receiving intents of the advertised type, while filtering out those that are not meaningful for the component.
Most of the contents of the filter are described by its<action>,<category>, and<data>subelements.For a more detailed discussion of filters, see the separate Intents and Intent Filters document, as well as the Intents Filters section in the introduction. - attributes:
-
android:icon- An icon that represents the parent activity, service, or broadcast receiver when that component is presented to the user as having the capability described by the filter.
This attribute must be set as a reference to a drawable resource containing the image definition. The default value is the icon set by the parent component'siconattribute. If the parent does not specify an icon, the default is the icon set by the<application>element.For more on intent filter icons, see Icons and Labels in the introduction. android:label- A user-readable label for the parent component. This label, rather than the one set by the parent component, is used when the component is presented to the user as having the capability described by the filter.
The label should be set as a reference to a string resource, so that it can be localized like other strings in the user interface. However, as a convenience while you're developing the application, it can also be set as a raw string.The default value is the label set by the parent component. If the parent does not specify a label, the default is the label set by the<application>element'slabelattribute.For more on intent filter labels, see Icons and Labels in the introduction. android:priority- The priority that should be given to the parent component with regard to handling intents of the type described by the filter. This attribute has meaning for both activities and broadcast receivers:
- It provides information about how able an activity is to respond to an intent that matches the filter, relative to other activities that could also respond to the intent. When an intent could be handled by multiple activities with different priorities, Android will consider only those with higher priority values as potential targets for the intent.
- It controls the order in which broadcast receivers are executed to receive broadcast messages. Those with higher priority values are called before those with lower values. (The order applies only to synchronous messages; it's ignored for asynchronous messages.)
Use this attribute only if you really need to impose a specific order in which the broadcasts are received, or want to force Android to prefer one activity over others.The value must be an integer, such as "100". Higher numbers have a higher priority. The default value is 0.In certain circumstances the requested priority is ignored and the value is capped to0. This occurs when:- A non-privileged application requests any priority >0
- A privileged application requests a priority >0 for
ACTION_VIEW,ACTION_SEND,ACTION_SENDTOorACTION_SEND_MULTIPLE
1.1. What are intents?
Android application components can connect to other Android applications. This connection is based on a task description represented by anIntentobject.Intents are asynchronous messages which allow application components to request functionality from other Android components. Intents allow you to interact with components from the same applications as well as with components contributed by other applications. For example, an activity can start an external activity for taking a picture.Intents are objects of theandroid.content.Intenttype. Your code can send them to the Android system defining the components you are targeting. For example, via thestartActivity()method you can define that the intent should be used to start an activity.An intent can contain data via aBundle. This data can be used by the receiving component.In Android the reuse of other application components is a concept known as task. An application can access other Android components to achieve a task. For example, from a component of your application you can trigger another component in the Android system, which manages photos, even if this component is not part of your application. In this component you select a photo and return to your application to use the selected photo.Such a flow of events is depicted in the following graphic.1.2. Starting activities or services
To start an activity, use the methodstartActivity(intent). This method is defined on theContextobject whichActivityextends.The following code demonstrates how you can start another activity via an intent.# Start the activity connect to the # specified class Intent i = new Intent(this, ActivityTwo.class); startActivity(i);Activities which are started by other Android activities are called sub-activities. This wording makes it easier to describe which activity is meant.To start a services via intents, use thestartService(Intent)method call.


TYPES OF INTENTS
1.Explicit
2. Implicit
Android Explicit Intent Example
Android Explicit intent specifies the component to be invoked from activity. In other words, we can call another activity in android by explicit intent.
We can also pass the information from one activity to another using explicit intent.
Here, we are going to see an example to call one activity from another and vice-versa.
Android calling one activity from another activity example
Let's see the simple example of android explicit example that calls one activity from another and vice versa.
Intent intent= new Intent(MainActivity.this , tab1_activity.class);
startActivity(intent)
Android Implicit Intent Example
Implicit intents do not declare the class name of the component to start, but instead declare an action to perform. The action specifies the thing you want to do, such as view, edit, send, or get something. Intents often also include data associated with the action, such as the address you want to view, or the email message you want to send. Depending on the intent you want to create, the data might be a Uri, one of several other data types, or the intent might not need data at all.
If your data is a Uri, there's a simple Intent() constructor you can use to define the action and data.
For example, here's how to create an intent to initiate a phone call using the Uri data to specify the telephone number:
Uri number = Uri.parse("tel:5551234");
Intent callIntent = new Intent(Intent.ACTION_DIAL, number);
When your app invokes this intent by calling startActivity(), the Phone app initiates a call to the given phone number.
Here are a couple other intents and their action and Uri data pairs
- View a web page:
Uri webpage = Uri.parse("http://www.android.com");
Intent webIntent = new Intent(Intent.ACTION_VIEW, webpage);
Other kinds of implicit intents require "extra" data that provide different data types, such as a string. You can add one or more pieces of extra data using the various putExtra() methods.
By default, the system determines the appropriate MIME type required by an intent based on the Uri data that's included. If you don't include a Uri in the intent, you should usually use setType() to specify the type of data associated with the intent. Setting the MIME type further specifies which kinds of activities should receive the intent.
Memory Management
The Android Runtime (ART) and Dalvik virtual machine use paging and memory-mapping (mmapping) to manage memory. This means that any memory an app modifies—whether by allocating new objects or touching mmapped pages—remains resident in RAM and cannot be paged out. The only way to release memory from an app is to release object references that the app holds, making the memory available to the garbage collector. That is with one exception: any files mmapped in without modification, such as code, can be paged out of RAM if the system wants to use that memory elsewhere.
Garbage Collection
A managed memory environment, like the ART or Dalvik virtual machine, keeps track of each memory allocation. Once it determines that a piece of memory is no longer being used by the program, it frees it back to the heap, without any intervention from the programmer. The mechanism for reclaiming unused memory within a managed memory environment is known as garbage collection. Garbage collection has two goals: find data objects in a program that cannot be accessed in the future; and reclaim the resources used by those objects.
Allocation and reclaim app memory
Uri, one of several other data types, or the intent might not need data at all.Uri, there's a simple Intent() constructor you can use to define the action and data.Uri data to specify the telephone number:startActivity(), the Phone app initiates a call to the given phone number.Uri data pairsUri webpage = Uri.parse("http://www.android.com"); Intent webIntent = new Intent(Intent.ACTION_VIEW, webpage);
putExtra() methods.Uri data that's included. If you don't include a Uri in the intent, you should usually use setType() to specify the type of data associated with the intent. Setting the MIME type further specifies which kinds of activities should receive the intent.
The Dalvik heap does not compact the logical size of the heap, meaning that Android does not defragment the heap to close up space. Android can only shrink the logical heap size when there is unused space at the end of the heap. However, the system can still reduce physical memory used by the heap. After garbage collection, Dalvik walks the heap and finds unused pages, then returns those pages to the kernel using madvise. So, paired allocations and deallocations of large chunks should result in reclaiming all (or nearly all) the physical memory used. However, reclaiming memory from small allocations can be much less efficient because the page used for a small allocation may still be shared with something else that has not yet been freed.
TABHOST
In Android, TabHost is a Container for tabbed window view. This object holds two children one is set of tab labels that the user clicks to select a specific tab and other is a FrameLayout object that displays the content of that page.
Whenever we need to enter or display a lot of information in one activity. A simple and effective method is to use tabs in your interface form which is done using TabHost in Android.
A Tabhost holds two children’s from which one is use to set the labels that the users clicks to select tab other is a FrameLayout that is used to display the content of that page. It means when you select any label (or you can say change the tab) the FrameLayout is used to display the content for that particular tab.
For Using TabHost in our MainActivity we need to extend TabActivity instead of Activity.
Basic TabHost XML code:
<?xml version="1.0" encoding="UTF-8"?>
<TabHost xmlns:android="http://schemas.android.com/apk/res/android"
android:id="@android:id/tabhost"
android:layout_width="fill_parent"
android:layout_height="fill_parent">
<LinearLayout
android:layout_width="fill_parent"
android:layout_height="fill_parent"
android:orientation="vertical">
<FrameLayout
android:id="@android:id/tabcontent"
android:layout_width="fill_parent"
android:layout_height="0dip"
android:layout_weight="1" />
<TabWidget
android:id="@android:id/tabs"
android:layout_width="fill_parent"
android:layout_height="wrap_content"
android:layout_marginBottom="-4dp"
android:layout_weight="0" />
</LinearLayout>
</TabHost>


Comments
Post a Comment